Events and Reactivity
Learning Objectives
- You know how to handle events in Svelte components.
- You know how to define reactive variables in Svelte.
- You know how to work with different types of data in reactive variables, including primitive values and objects.
Events and Svelte
When working with Svelte components, we can use event attributes in a similar way as in HTML. Event attributes are added to HTML elements in Svelte components like in HTML, but the values of the event attributes must be JavaScript expressions. The JavaScript expressions are written in curly braces.
That is, instead of writing onclick="alert('Hello, Svelte!')" as we would do in Vanilla HTML and JavaScript, in Svelte, we write onclick={() => alert("Hello, Svelte!")}.
The following Svelte component has a button that shows an alert dialog with the message “Hello” when the button is clicked. The code is placed in the onclick event attribute of the button.
<button onclick={() => alert("Hello, Svelte!")}>Hello!</button>Alternatively, events can be handled by calling a function. The following outlines a Svelte component that has a button with an onclick event attribute. The value of the event attribute is a JavaScript expression that calls the alert function with the message “Hello”.
<script>  const showAlert = () => {    alert("Hello, Svelte!");  };</script>
<button onclick={showAlert}>Hello!</button>Prior to Svelte 5, event attributes were written with a prefix on, followed by a colon, and the event name. For example, on:click, on:change, on:mouseover, etc.
In Svelte 5, event attributes are written without the colon as onclick, onchange, and so on.
Reactivity
One of the most powerful features of Svelte is reactivity, which allows the user interface to automatically update whenever the underlying data changes. This means that when a variable is updated, Svelte automatically re-renders the parts of the user interface that depend on that variable.
The reactivity system more broadly relates to reactive programming, which is a programming paradigm that focuses on how changes in data are propagated through the application.
In Svelte, reactivity is achieved through reactive variables. Reactive variables are defined using Svelte’s $state() function, which takes an initial value and returns a reactive variable. As an example, the following line declares a reactive variable called count with the initial count at 0.
let count = $state(0);Variable values can be injected into the HTML template by using curly braces. Jointly, variable declaration and usage looks as follows.
<script>  let count = $state(0);</script>
<p>Count: {count}</p>
As we know about events, we can also use events to update reactive variables. When an event happens, we can call a function that updates the value of a reactive variable. As Svelte automatically tracks the dependencies of reactive variables, whenever the value of a reactive variable changes, Svelte re-renders the parts of the user interface that depend on that variable.
The following Svelte component would show a button that increments a reactive variable count by one whenever the button is clicked. Pressing the button once leads to the text “Count: 1” being shown in the browser.
<script>  let count = $state(0);
  const incrementCount = () => {    count++;  };</script>
<p>Count: {count}</p><button onclick={incrementCount}>Increment</button>Event objects and reactivity
The event object is the same as in vanilla JavaScript and HTML. Whenever an event happens, the browser creates an event object that is passed as a parameter to the function that is called in response to the event.
The event object is an instance of the Event interface, which is a built-in JavaScript object that contains information about the event.
The following example shows a Svelte component that has a reactive variable and an input field. Whenever the user types in content to the input field, the text is updated in the reactive variable text.
<script>  let text = $state("");
  const textChanged = (event) => {    text = event.target.value;  };</script>
<p>Text: {text}</p><input type="text" oninput={textChanged} />
The above example also logs the event object to the browser console whenever the input field value is changed. The event object contains information about the event, such as the type of the event, the target element, and other properties related to the event.
To see what the event object contains, run the example locally, and open the browser console. The console can be opened by right-clicking the browser window and selecting “Inspect” or by pressing
F12orCtrl+Shift+I.
Reactivity applies also to properties, not just to primitive values such as numbers and strings. As an example, we could show the length of the text in an input field using the length property that is available for string values.
The following component demonstrates this by showing both the text and the length of the text.
<script>  let text = $state("");
  const textChanged = (event) => {    text = event.target.value;  };</script>
<p>Text: {text} (length: {text.length})</p><input type="text" oninput={textChanged} />Special syntax: input bindings
Svelte has a special syntax for binding the value of an input field to a reactive variable. This is done using the bind directive, which is used jointly with the name of an attribute that should be bound. For example, bind:value binds the attribute value. The directive is given a variable that the value should be bound to, e.g. bind:value={text}.
The following shows how bind:value is used to bind the value of an input field to a variable, replicating the functionality of the example from the end of the last chapter. When the user types text to the input field, the changes are reflected to the variable text and shown to the user.
<script>  let text = $state("");</script>
<input type="text" bind:value={text} />
<p>Text: {text}</p>
As text is a reactive variable, we can also use it in other parts of the component. For example, below, we also show the length of the text.
<script> let text = $state("");</script>
<input type="text" bind:value={text} />
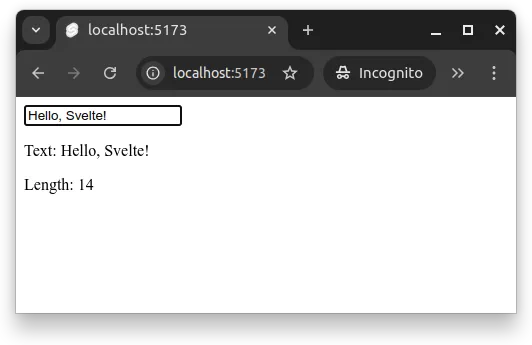
<p>Text: {text}</p><p>Length: {text.length}</p>Now, whenever the user types in text to the input field, the typed text is shown to the user, and the length of the text is shown below the input field. As an example, Figure 1 below shows a screenshot of the component when the user has typed “Hello, Svelte!” to the input field.
The binding must correspond to the internals of the HTML element. For example, text input fields store the value internally to the value property, while checkboxes store the value internally to the checked property. Thus, when using input bindings, we must use the correct property for the HTML element.
The following example shows a Svelte component that has a checkbox input field. The checkbox is bound to the reactive variable isChecked using the bind:checked directive. Whenever the user checks or unchecks the checkbox, the value of the reactive variable isChecked is updated accordingly.
<script>  let isChecked = $state(false);</script>
<p>Checkbox is {isChecked ? "checked" : "not checked"}</p><input type="checkbox" bind:checked={isChecked} />Reactivity and objects
We can make (pretty much) any type of data reactive. The following example shows a reactive object with two properties. The first property is a number, while the second property is a note about the number. The note changes to “not single digits” when the number is greater than 9.
<script>  let countState = $state({    count: 0,    note: "single digits",  });
  const increment = () => {    countState.count++;
    if (countState.count > 9) {      countState.note = "not single digits";    }  };</script>
<p>Count: {countState.count} ({countState.note})</p><button onclick={increment}>Increment count</button>
Updates and methods
Updates to the user interface are triggered whenever the value of a reactive variable changes. For basic JavaScript objects including collections, this holds also for changes from method calls.
To demonstrate this, let’s add a new property to the object countState that is used to keep track of a list of numbers. The list is initially empty, and we add a new item to the list with the method push every time the count is incremented. The user interface is updated to show the total number of items in the list.
<script>  let countState = $state({    count: 0,    note: "single digits",    numbers: [],  });
  const increment = () => {    countState.count++;
    countState.numbers.push(countState.count);
    if (countState.count > 9) {      countState.note = "not single digits";    }  };</script>
<p>Count: {countState.count} ({countState.note})</p><p>Total numbers: {countState.numbers.length}</p><button onclick={increment}>Increment count</button>
Instead of showing the total numbers in the list, we could also have more complex logic such as displaying the sum of the numbers in the list. The following example uses the reduce method of the list to calculate the sum of the numbers in the list.
<script>  let countState = $state({    count: 0,    note: "single digits",    numbers: [],  });
  const increment = () => {    countState.count++;
    countState.numbers.push(countState.count);
    if (countState.count > 9) {      countState.note = "not single digits";    }  };</script>
<p>Count: {countState.count} ({countState.note})</p><p>Sum: {countState.numbers.reduce((a, b) => a + b, 0)}</p><button onclick={increment}>Increment count</button>Summary
To summarize:
- Events in Svelte are handled similarly to how they are handled in HTML and JavaScript. The main difference is that event attribute values in Svelte must be JavaScript expressions written in curly braces.
- Svelte has a reactivity system that automatically updates the user interface whenever the underlying data changes.
- Reactive variables are defined using Svelte’s
$state()function. - Inputs can be bound to reactive variables using the
binddirective. - Svelte’s reactivity system supports both primitive values and objects, including collections.