Forms and Form Events
Learning Objectives
- You know how to handle form events in Svelte.
- You know how to programmatically transform form data to an object.
- You know how to show form data in the application.
Form events
Like events in general, form events can also be handled in Svelte. The following component outlines a form with a text field and a submit button. To react to submit events, i.e. the user pressing the submit button, we use the onsubmit event attribute. The event attribute is given the name of the function that handles the event.
Note that now, we do not enter the
actionormethodattributes to theformelement. This is because we want to handle the form submission in JavaScript.
<script>  const submitForm = (e) => {    e.preventDefault();
    console.log("Handling form submission in JavaScript");  };</script>
<form onsubmit={submitForm}>  <label>    Item name    <input      id="name"      name="name"      type="text"      placeholder="Enter text"    />  </label>  <input type="submit" value="Submit form" /></form>
In the above example, the submitForm function prevents the default form submission behavior using the preventDefault method of the event and logs the text “Handling form submission in JavaScript” to the console.
Preventing the default behavior is crucial. Otherwise, the form would be submitted to the server, causing the page to reload.
Form data from event
To access the data entered into the form, we can use the target attribute of the event and construct an instance of FormData from it.
The
FormDataconstructor takes the form element as an argument and creates a newFormDatainstance that contains the data entered into the form fields. TheFormDatainstance can then be used to retrieve the values of the form fields.
Individual fields can be accessed using the get method of the FormData instance, or all fields can be iterated over using the entries method. Alternatively, we can use the Object.fromEntries method to convert the FormData instance into a JavaScript object. This is a convenient way to work with form data, as it allows us to access the form fields as properties of an object.
The following outlines how to create an object that contains the form data when the form is submitted.
<script>  const submitForm = (e) => {    e.preventDefault();
    const formData = new FormData(e.target);    const data = Object.fromEntries(formData);    console.log(data);  };</script>
<form onsubmit={submitForm}>  <label>    Item name    <input      id="name"      name="name"      type="text"      placeholder="Enter text"    />  </label>  <input type="submit" value="Submit form" /></form>
Now, when we submit the form, we see the form data logged as a JavaScript object in the console. The object contains the form field names as keys and the field values as values.
The
nameattribute of each input field is used to identify the form field in the form data. If we do not provide thenameattribute, the field will not be included in the form data.
To reset the form once it has been submitted, we call the reset method of the form element. The method resets the form fields to their initial values.
  const submitForm = (e) => {    e.preventDefault();
    const formData = new FormData(e.target);    const data = Object.fromEntries(formData);    console.log(data);
// resets the form fields to their initial values e.target.reset(); };Showing form data in the application
Now, with information about handling form events, and our prior knowledge of events and reactivity in Svelte, we can create a form that adds items to a list and shows them to the user. For this, we need:
- A reactive variable to hold the list of items.
- A function to handle the form submission event.
- A form with input fields for the item data and a submit button.
- A way to display the list of items in the application.
The following example outlines a full Svelte component that implements the above requirements. The component has a form with an input field for the item name and a submit button. When the form is submitted, the addItem function is called, which retrieves the form data and adds it to the list of items.
<script>  // reactive variable to hold the list of items  let items = $state([]);
  // function to handle the form submission event  const addItem = (e) => {    e.preventDefault();
    const item = Object.fromEntries(new FormData(e.target));    item.id = items.length + 1;    items.push(item);    e.target.reset();  };</script>
<h1>Items</h1>
<h2>Add Item</h2>
<!-- form with input field for item name and submit button --><form onsubmit={addItem}>  <label>    Item name    <input      id="name"      name="name"      type="text"      placeholder="Enter a new item"    />  </label>  <input type="submit" value="Add Item" /></form>
<h2>Existing items</h2>
<!-- display the list of items --><ul>  {#each items as item}    <li>{item.name}</li>  {/each}</ul>
As the items list is reactive, it is automatically updated when the contents change. Adding functionality for removing items from the list is also straightforward. We could, for example, add an onclick to the li element that removes the item from the list when clicked.
<script>  // a reactive variable to hold the list of items  let items = $state([]);
  // function to handle the form submission event  const addItem = (e) => {    e.preventDefault();
    const item = Object.fromEntries(new FormData(e.target));    item.id = items.length + 1;    items.push(item);    e.target.reset();  };
  // function to remove an item from the list  const removeItem = (id) => {    items = items.filter((item) => item.id !== id);  };</script>
<h1>Items</h1>
<h2>Add Item</h2>
<!-- form with input field for item name and submit button --><form onsubmit={addItem}>  <label>    Item name    <input      id="name"      name="name"      type="text"      placeholder="Enter a new item"    />  </label>  <input type="submit" value="Add Item" /></form>
<h2>Existing items</h2>
<!-- display the list of items and allow removing them --><ul>  {#each items as item}    <li onclick={() => removeItem(item.id)}>{item.name}</li>  {/each}</ul>
Recall that the
onclickattribute is a function:() => removeItem(id). If we would use justremoveItem(id), the function would be called when the component is rendered, not when the item is clicked.
Back to books
Let’s get back to the books application that we’ve previously worked on. In the part Client-Side Pages, Components, and Interactivity, we created an application that allows manipulating books and chapters in the browser’s local storage. At that point, each book had an identifier and a name. The chapters had also a name and an identifier, and they were associated with books through the book’s identifier using local storage.
When entering books and chapters, we used an input with input binding for adding the book or chapter.
Then, in the part on Server-Side Functionality with a Database, we constructed an API for handling books and chapters. The data format for books was as follows:
{ "id": 1, "title": "Title", "description": "Description", "published_at": "2023-12-31", "page_count": 200}While the data format for chapters was as follows:
{ "id": 1, "book_id": 1, "chapter_number": 1, "title": "Chapter title", "content": "Chapter content"}Next, we’ll align the books application with the data format used in the API. We’ll also change the way we add books and chapters, using forms instead of input binding. This will act as the basis for later when we connect the application to the API.
Adding books
Previously, our AddBook.svelte component looked as follows:
<script>  import { useBookState } from "$lib/states/bookState.svelte.js";  let bookState = useBookState();
  let bookName = $state("");  const addBook = () => {    bookState.addBook(bookName);    bookName = "";  };</script>
<input type="text" bind:value={bookName} placeholder="Book name" /><button onclick={addBook}>Add Book</button>
To allow adding books using a form so that the user can enter the title, description, published date, and page count of the book, we need to make some changes. We’ll first need a form for entering the book details, and then we need to handle the form submission event to add the book to the list.
Rename the AddBook.svelte to BookForm.svelte and then modify its content to match the following:
<script>  import { useBookState } from "$lib/states/bookState.svelte.js";
  let bookState = useBookState();
  const addBook = (e) => {    e.preventDefault();
    const book = Object.fromEntries(new FormData(e.target));    bookState.addBook(book);    e.target.reset();  };</script>
<form onsubmit={addBook}>  <label>    Title    <input      id="title"      name="title"      type="text"      placeholder="Book title"    />  </label>  <br />  <label>    Description    <textarea      id="description"      name="description"      placeholder="Enter book description"    ></textarea>  </label>  <br />  <label>    Published at    <input id="published_at" name="published_at" type="date" />  </label>  <br />  <label>    Page count    <input id="page_count" name="page_count" type="number" />  </label>  <br />  <input type="submit" value="Add Book" /></form>
And then, modify the bookState.svelte.js to handle the new book format. Previously, the function for adding a book looked as follows:
addBook: (name) => { bookState.push({ id: bookState.length + 1, name }); saveBooks(); },Above, the addBook function accepted a single argument, the name of the book. We need to change it so that it accepts a book object. Furthermore, we need to assign an identifier for the book.
After modifying the function to take a book object and assign an identifier, the modified function would look as follows:
addBook: (book) => { book.id = bookState.length + 1; bookState.push(book); saveBooks(); },Now, our application has a form for adding books with a title, description, published date, and page count using a form.
Adjusting books page
As the AddBook.svelte component was renamed to BookForm.svelte, we need to adjust the src/routes/books/+page.svelte file to import the new component. Modify the src/routes/books/+page.svelte file to the following (we’ll also make the listing and adding books more explicit by adding headers):
<script>  import BookForm from "$lib/components/BookForm.svelte";  import BookList from "$lib/components/BookList.svelte";</script>
<h1>Books</h1>
<BookList />
<h2>Add a book</h2>
<BookForm />
Now, when we add books using the form, the books are added to the list. However, as we’ve previously used book.name to show the book name in the list, the names are not correctly shown.
Correctly listing books
The next component to modify is the BookList.svelte component. Previously, it looked as follows:
<script>  import { useBookState } from "$lib/states/bookState.svelte.js";
  let bookState = useBookState();</script>
<ul>  {#each bookState.books as book}    <li>      <a href={`/books/${book.id}`}>{book.name}</a>    </li>  {/each}</ul>
The only change needed here is to change the link text from book.name to book.title, as the book object now has a title property instead of a name property. The modified BookList.svelte would look as follows:
<script>  import { useBookState } from "$lib/states/bookState.svelte.js";
  let bookState = useBookState();</script>
<ul>  {#each bookState.books as book}    <li>      <a href={`/books/${book.id}`}>{book.title}</a>    </li>  {/each}</ul>
Now, when we add books, the titles are correctly shown in the list.
Removing books
For completeness, we can also add functionality for removing books from the list. This was done in an exercise in the chapter Sharing State Between Components — let’s implement it here as well.
Let’s first add a deleteById function to the bookState.svelte.js file, and then modify the BookList.svelte component to use this function. The deleteById function would look as follows:
deleteById: (id) => { bookState = bookState.filter((b) => b.id !== id); saveBooks(); },And the functionality for removing a book from the list would be done by adding a button next to each book in the list that calls a function to remove the book when clicked. The modified BookList.svelte would look as follows — unlike “Delete” in the exercise, we use “Remove” as the button text here:
<script> import { useBookState } from "$lib/states/bookState.svelte.js";
let bookState = useBookState();
const removeBook = (book) => { bookState.deleteById(book.id); };</script>
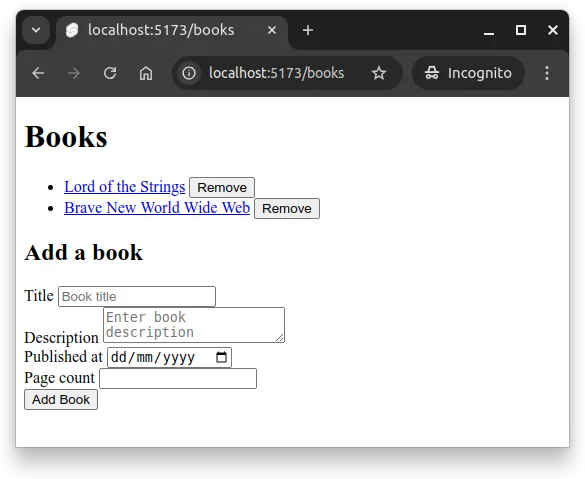
<ul> {#each bookState.books as book} <li> <a href={`/books/${book.id}`}>{book.title}</a> <button onclick={() => removeBook(book)}>Remove</button> </li> {/each}</ul>At this point, the application allows adding books with a form, listing books, and removing books. Figure 1 below shows what the application looks like when two titles have been entered by the user.
Showing book details
Next, we can adjust the Book.svelte component to display the details of a book when the user clicks on a book title in the list. Previously, the component looked as follows:
<script>  let { bookId } = $props();  import ChapterList from "$lib/components/books/ChapterList.svelte";  import { useBookState } from "$lib/states/bookState.svelte.js";
  let bookState = useBookState();
  let book = bookState.getOne(bookId);</script>
<h1>{book ? book.name : "Loading..."}</h1>
<ChapterList {bookId} />
Let’s modify it to display the title and details of the book. We’ll use an if-else block to show a loading message while the book is being fetched, and then display the book details once the book is available. The modified Book.svelte would look as follows:
<script>  let { bookId } = $props();  import ChapterList from "$lib/components/books/ChapterList.svelte";  import { useBookState } from "$lib/states/bookState.svelte.js";
  let bookState = useBookState();
  let book = bookState.getOne(bookId);</script>
{#if book}  <h1>{book.title}</h1>
  <p><strong>Description:</strong> {book.description}</p>  <p><strong>Published at:</strong> {book.published_at}</p>  <p><strong>Page count:</strong> {book.page_count}</p>{:else}  <h1>Loading...</h1>{/if}
<ChapterList {bookId} />
Now, the individual book page would display the title, description, published date, and page count of the book. It also shows a list of chapters associated with the book and allows the user to add new chapters.
The same approach would be used to modify the functionality used for adding chapters. We would create a form for adding chapters, handle the form submission event to add the chapter to the list, and adjust the chapter listing to show the chapter titles.
Summary
In summary:
- We can handle form events in Svelte using the event attribute
onsubmit. - We can access form data using the
FormDataconstructor and convert it to a JavaScript object usingObject.fromEntries. - When processing form submissions in JavaScript, we want to prevent the default behavior using
e.preventDefault().